7 Technical Steps to Fix Bambu Lab P1S Heat Creep Clog (Stop Mid-Print Failures!)
If you are staring at your build plate wondering why a perfectly flat, flawless first layer suddenly turned into a brittle, stringy nightmare mid-print, you are experiencing a severe thermodynamic failure. This is not a random slicing error or an issue with your digital file. To permanently fix Bambu Lab P1S heat creep clog anomalies, you must shift your focus away from standard bed adhesion troubleshooting and look directly at the thermal management of your toolhead.
Many operators fire up their Bambu Lab P1S, load up standard white PLA, and execute a print with a standard 200°C nozzle and 60°C bed temperature. For the first 10 to 15 layers, everything looks impeccable. The plastic flows, the layers bond, and the machine operates smoothly. Then, inexplicably, the extrusion thins out, the extruder gears begin to click, and the print turns into a fragile, sponge-like lattice.
In this exhaustive diagnostic manual, we will deconstruct the exact physics occurring inside your Bambu Lab hotend. We will analyze why early layers succeed while later layers fail catastrophically. By executing these specific engineering teardowns and thermal management strategies, you will definitively fix Bambu Lab P1S heat creep clog failures and restore your CoreXY machine to reliable, industrial-grade operation.
The “Quick Answer” / Key Takeaways Box
- The Mid-Print Symptom: A clog that occurs 15 layers into a print is the hallmark signature of heat creep. The cold side of your hotend is getting too hot, causing the PLA to swell and jam before it reaches the melt zone.
- The Enclosure Trap: Printing standard PLA inside a fully enclosed P1S with a 60°C bed temperature creates an ambient chamber temperature that exceeds PLA’s glass transition threshold.
- Heatsink Fan Failure: If the tiny cooling fan attached directly to your hotend heatsink is weakening, clogged with dust, or failing, heat creep is inevitable.
- The Cold Pull Protocol: Simply pushing filament through will not clear heat creep residue. You must execute a high-tension cold pull to extract the expanded polymer plug from the heatbreak.
- Open the Door: The fastest immediate mitigation for PLA heat creep in a P1S is simply opening the front glass door and removing the top glass panel to exhaust ambient heat.
The Physics of a Mid-Print Failure
Before dismantling the toolhead, it is critical to understand the fluid dynamics and thermodynamics of Fused Deposition Modeling (FDM). When a print fails from the very first layer, you are usually dealing with a Z-offset issue, an unlevel bed, or a hard nozzle jam. However, your reference image, not-even-sure-how-to-diagnose-this-v0-2k9gtiiilsch1.webp, shows a completely different mechanical phenomenon.
The first few millimeters of your part printed perfectly. This proves that your nozzle orifice is clear, your extruder gears have physical grip, and your initial flow calibration is mathematically sound. The failure only occurred after sustained operation.
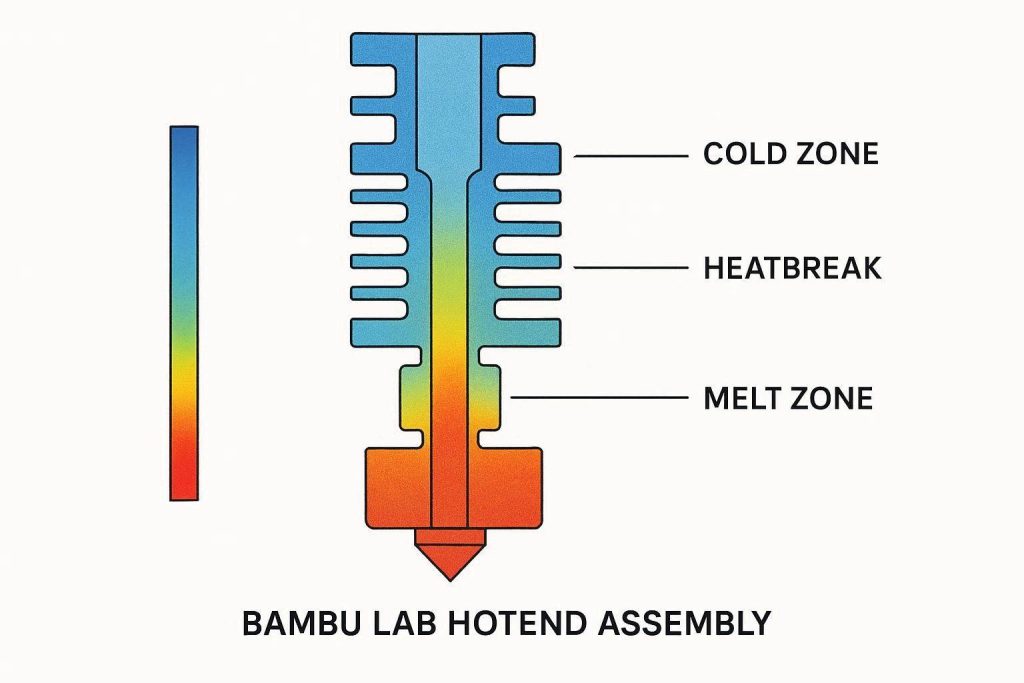
This delayed failure curve happens because heat takes time to travel. When you start a print from a cold machine, the upper portion of your hotend—the heatbreak and the heatsink—are at room temperature. The PLA filament easily slides down this cold metal tube, enters the 200°C melt zone, liquidates, and extrudes normally.
However, as the 200°C ceramic heater runs continuously, thermal energy naturally attempts to travel upwards into the cold zone. This is a universal law of thermodynamics. To effectively fix Bambu Lab P1S heat creep clog scenarios, you must understand how your printer fights this upward thermal energy.
What is Heat Creep in the Bambu Lab P1S?
To maintain the strict separation between solid filament and molten plastic, the Bambu Lab hotend utilizes an ultra-thin metal tube called a heatbreak. Above this heatbreak sits an aluminum heatsink, and bolted directly to that heatsink is a small, high-speed cooling fan.
The sole purpose of this fan is to constantly blast ambient air across the aluminum fins, violently stripping the creeping heat away from the metal. As long as this fan is operating at maximum RPM, the thermal energy is contained within the ceramic heater block at the bottom.
The Polymer Swell
If the heatsink fan fails to remove the heat fast enough, the thermal energy breaches the heatbreak and enters the upper cooling zone. This is where the catastrophe begins.
Standard PLA plastic has an incredibly low “glass transition temperature.” This is the specific thermal point where the plastic stops being a rigid solid and becomes a soft, sticky, rubbery material. For most PLA blends, this transition occurs at roughly 55°C to 60°C.
When the heat creeps up the metal tube and reaches 60°C in the “cold zone,” the incoming strand of solid PLA softens prematurely. The downward pressure from the extruder gears squashes this soft, rubbery plastic outwards. The filament literally swells up like a balloon, expanding to fill the entire internal diameter of the metal tube.
The Inevitable Jam
Once the filament swells to the exact diameter of the heatbreak bore, friction increases exponentially. The plastic acts like a customized rubber cork. The extruder gears up top continue to push, but the swollen plug refuses to move down into the melt zone.
The gears begin to grind against the filament, shaving off plastic dust. The nozzle is starved of material, resulting in the horrific, stringy under-extrusion visible in your diagnostic photos. To comprehensively fix Bambu Lab P1S heat creep clog failures, we must eliminate the environmental and mechanical factors causing this premature polymer swelling.
Official PrusaSlicer Documentation on the Thermodynamics of Heat Creep and Polymer Glass Transition
Step 1: The Enclosure Ambient Temperature Trap
The Bambu Lab P1S is a phenomenal machine, heavily upgraded from the P1P specifically because it includes a fully enclosed chamber. This enclosure is absolutely mandatory for printing advanced engineering polymers like ABS, ASA, and Polycarbonate, which require high ambient heat to prevent warping.
However, this incredible feature becomes a fatal flaw when printing standard PLA.
The 60°C Bed Radiator
Your slicer settings dictate a bed temperature of 60°C. The Bambu Lab build plate is a massive, highly efficient aluminum radiator. As it sits at 60°C for 30 to 40 minutes, it continuously dumps thermal energy into the trapped air inside the closed P1S chamber.
Because the glass door is shut and the top glass is on, this heat has nowhere to go. The ambient air temperature inside the printer slowly rises from 22°C (room temperature) up to 40°C, and eventually pushes towards 45°C or higher.
Crippling the Heatsink
Remember, the heatsink fan relies on blowing cool ambient air across the aluminum fins to stop heat creep. If the ambient air inside the printer is already 45°C, the fan is essentially blowing hot air onto a hot metal heatsink. The cooling efficiency drops to near zero.
The heat quickly breaches the cold zone, the PLA hits its 55°C glass transition limit, swells up, and the print fails exactly 15 layers in. The absolute fastest way to instantly fix Bambu Lab P1S heat creep clog is to alter the chamber environment.
When printing PLA in a P1S, you must physically prop the front glass door open by at least two inches, and completely remove the top glass panel. This allows the hot air generated by the 60°C bed to exhaust into your room, keeping the internal chamber cool and allowing the heatsink fan to function optimally.
Step 2: Diagnosing Hotend Cooling Fan Failure
If you have opened the door and removed the top glass, but you are still experiencing mid-print under-extrusion, you have a physical hardware failure. The primary suspect is the hotend heatsink fan.
Unlike the massive auxiliary part cooling fan mounted to the side of the toolhead, the heatsink fan is a tiny, highly sensitive component tucked directly behind the front toolhead cover.
Dust, Debris, and Micro-Fractures
Over hundreds of hours of printing, the internal environment of a 3D printer becomes surprisingly dirty. Microscopic strands of plastic (“angel hair”) and fine dust get sucked directly into the heatsink fan housing.
This debris wraps around the tiny motor shaft, slowly adding physical drag to the fan. The motherboard commands the fan to spin at 100% (typically around 8,000 RPM for micro-fans), but the physical resistance from the dust drops the actual speed to 4,000 RPM.
At half-speed, the fan cannot move enough CFM (Cubic Feet per Minute) of air to stop the heat from creeping upwards.
The Fan Inspection Protocol
To properly fix Bambu Lab P1S heat creep clog issues related to hardware degradation, you must physically inspect the fan.
- Power down the machine and carefully pull the magnetic front toolhead cover off the assembly.
- Do not immediately disconnect the wires; let the cover hang gently.
- Look directly at the small fan bolted to the front of the silver heatsink.
- Use a bright flashlight. If you see white dust packed tightly between the fan blades, or wrapped around the central bearing, the fan is choking.
Use precision tweezers to meticulously remove every strand of debris. Do not use compressed air to blast it while connected, as spinning a DC fan with compressed air can induce a reverse voltage spike that destroys the toolhead motherboard. If the fan blades are physically cracked or the fan makes a loud whining noise upon startup, it must be completely replaced.
Step 3: Executing a High-Tension Cold Pull
When heat creep occurs, you cannot simply push more filament behind it to clear the jam. You cannot use the thin metal acupuncture needle provided in the toolkit, because the jam is not at the nozzle tip. The swollen plug of plastic is lodged high up inside the metal heatbreak.
Attempting to extrude will only strip your extruder gears. To effectively fix Bambu Lab P1S heat creep clog blockages, you must physically rip the swollen plug backward out of the toolhead. This requires a precise cold pull.
The Cold Pull Methodology
- Navigate to the temperature control screen on your Bambu P1S interface.
- Manually set the nozzle temperature to 220°C to fully melt the plastic trapped inside.
- Once heated, manually press the extruder lever and physically push the filament down about 10mm. You must ensure molten plastic fills every microscopic gap in the blockage.
- Immediately turn off the heater and set the target temperature to exactly 90°C.
- Watch the temperature fall. As it drops past 140°C, the PLA will transition from a liquid back into a highly viscous, sticky solid.
When the sensor reads exactly 90°C, the plastic is cool enough to hold together as a single solid mass, but warm enough to release from the metal walls. Grab the filament above the toolhead with a pair of pliers and pull upwards with extreme, steady force.
You should hear a distinct “pop.” Inspect the tip of the extracted filament. It will look like a perfect, reverse-mold of the inside of your hotend. If you see a thick, swollen cylinder right above the nozzle tip, you have successfully extracted the heat creep plug.
Step 4: Slicer Settings and Volumetric Flow
You mentioned in your diagnostic notes that you are printing at 200°C. For many generic, older Cartesian printers, 200°C is standard for PLA. However, the Bambu Lab P1S is a high-speed CoreXY kinematic system.
When a printer attempts to move at 300mm/s, it must melt plastic at a phenomenal volumetric rate. To achieve this flow, Bambu Lab default profiles typically push standard PLA closer to 220°C.
The Pressure Variable
By dropping your temperature down to 200°C, you are increasing the viscosity of the molten plastic. Thicker plastic requires significantly more back-pressure from the extruder to force it through the 0.4mm nozzle.
This immense internal back-pressure creates a bottleneck in the melt zone. The plastic sits in the hotend slightly longer than expected because it is fighting to exit the nozzle. This extra residence time allows thermal energy to transfer deeper into the filament strand, accelerating the heat creep process.
To permanently fix Bambu Lab P1S heat creep clog anomalies related to slicing, you must trust the default thermodynamic profiles. Return your PLA printing temperature to the Bambu Studio default of 220°C. The slightly hotter, more fluid plastic will exit the nozzle with significantly less resistance, dropping the internal pressure and preventing the filament from stalling in the cold zone.
Step 5: Extruder Gear Wear and Grinding
If you have mitigated the chamber heat, replaced the fan, and cleared the clog, but the mid-print failure continues, you must inspect the extruder gears. Heat creep is often the initiating event, but it causes a cascade of mechanical damage that persists even after the thermal issue is resolved.
When the filament swelled and jammed the heatbreak, the extruder motor did not stop. The stainless steel gears continued to grind aggressively against the stationary PLA strand.
The Dust Packing Failure
This violent grinding shaves off fine white plastic dust. This dust is highly problematic. It does not just fall out of the printer; it packs tightly into the deep grooves of the extruder gear teeth.
Once the teeth are packed solid with plastic dust, they physically become smooth cylinders. They completely lose their sharp, biting edge. Even if you clear the heat creep clog perfectly, the next print will fail midway through because the smooth, packed gears simply cannot grip the filament tight enough to push it consistently.
Extruder Disassembly
You must open the extruder housing to visually inspect the gears.
- Remove the three screws securing the extruder unit to the carbon fiber X-axis rod assembly.
- Carefully split the plastic extruder housing open.
- Inspect the yellow drive gear and the metal idler gear under bright light.
If the teeth are packed with white dust, use a stiff nylon brush (or a dry toothbrush) to violently scrub the teeth clean. Ensure every single groove is deeply cleared. This mechanical restoration is absolutely mandatory to fully fix Bambu Lab P1S heat creep clog symptoms and restore high-speed volumetric output.
The Permanent Fix: Premium Upgrades
While modifying your slicing profiles and leaving the enclosure door open will mitigate the vast majority of PLA thermal failures, relying on workarounds is frustrating. If you want absolute reliability without babysitting the machine’s ambient environment, you must upgrade the physical hardware pathway.
Stock components are engineered for acceptable margins across multiple materials. To achieve industrial-grade uptime and permanently fix Bambu Lab P1S heat creep clog issues, you must invest in highly specialized, flow-optimized upgrades.
1. Upgrade to a Hardened Steel / CHT Hotend
The stock stainless steel hotend provided with the P1S is highly susceptible to internal bore scarring. Once the internal heatbreak is scratched by abrasive pigments, friction increases, making heat creep jams vastly more likely.
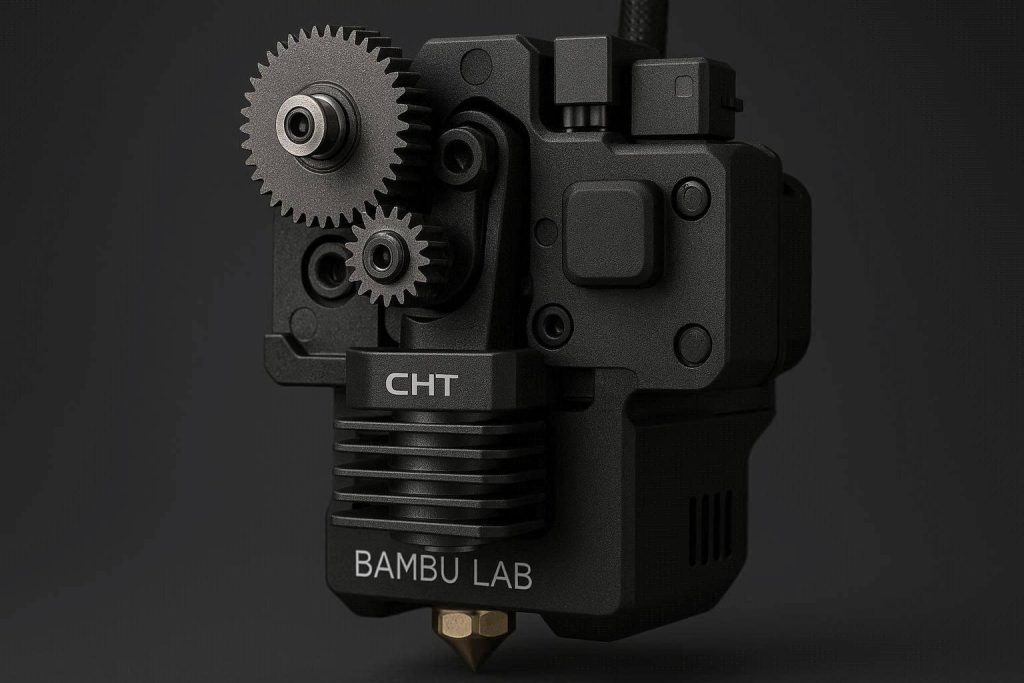
You must upgrade your toolhead to a premium aftermarket Complete Hotend Assembly featuring CHT (Core Heating Technology) geometry. These advanced hotends split the filament into three separate pathways inside the melt zone, instantly melting the core of the plastic. This exponentially decreases back-pressure, ensuring the plastic flows out of the nozzle before heat has time to creep upwards.
You can source complete, drop-in CHT hotend assemblies directly through premium industrial suppliers via the MatterHackers or ShareASale affiliate networks. Installing a high-flow hotend completely changes the thermodynamic equation, allowing you to print faster and safer.
2. Install Hardened Steel Extruder Gears
If you opened your extruder and found the stock stainless steel gears rounded, blunted, or permanently packed with dust, you must discard them. Stainless steel is simply too soft for thousands of hours of high-speed retractions.
Upgrade instantly to the official Hardened Steel Extruder Gear assembly. These CNC-machined, heat-treated gears possess incredibly sharp, aggressive teeth that bite deeply into the filament. Even if minor thermal swelling occurs in the heatbreak, the massive torque and unyielding grip of hardened steel gears will simply brute-force the plastic through, preventing the mid-print starvation failure entirely. Sourcing these through authorized vendors ensures absolute dimensional accuracy.
3. Implement an Active Chamber Ventilation System
If you absolutely must keep the glass door closed (due to pets, children, or noise constraints), you cannot rely on passive cooling. You must implement a premium active ventilation system.
By installing an upgraded heavy-duty exhaust fan to the rear of the P1S chassis and utilizing an activated carbon HEPA filtration block, you can actively pump the hot 45°C air out of the chamber while simultaneously scrubbing VOCs (Volatile Organic Compounds). This secures a cool ambient internal environment, guaranteeing the heatsink fan has fresh, cold air to prevent thermal creep, regardless of how long the 60°C bed is running.
Quick-Action Preventative Maintenance Checklist
Once you have cleared the thermal jams and optimized your toolhead hardware, implement this strict preventative maintenance protocol before your next multi-hour manufacturing run:
- Ventilate for PLA: Make it a strict operational rule: If printing PLA, PETG, or TPU, the front door must be cracked open and the top glass removed to prevent ambient heat accumulation.
- Audit Slicer Temperatures: Stop artificially lowering print temperatures to combat stringing. If you use Bambu Lab PLA, print at the profile default of 220°C to minimize internal nozzle back-pressure.
- Weekly Fan Inspection: The heatsink cooling fan is the only defense against heat creep. Inspect it weekly with a flashlight. If you see dust buildup, remove it immediately with precision tweezers.
- Execute Routine Cold Pulls: Do not wait for a catastrophic mid-print failure. Run a high-tension nylon or PLA cold pull every 100 print hours to extract microscopic carbonized debris before it restricts flow and increases friction.
By treating your Bambu Lab P1S as a highly sensitive thermodynamic ecosystem and respecting the strict glass transition limitations of standard polymers, you will completely eliminate frustrating mid-print failures. Stop accepting stringy, weak layers, upgrade your cooling hardware, and start manufacturing with elite, uninterrupted precision.